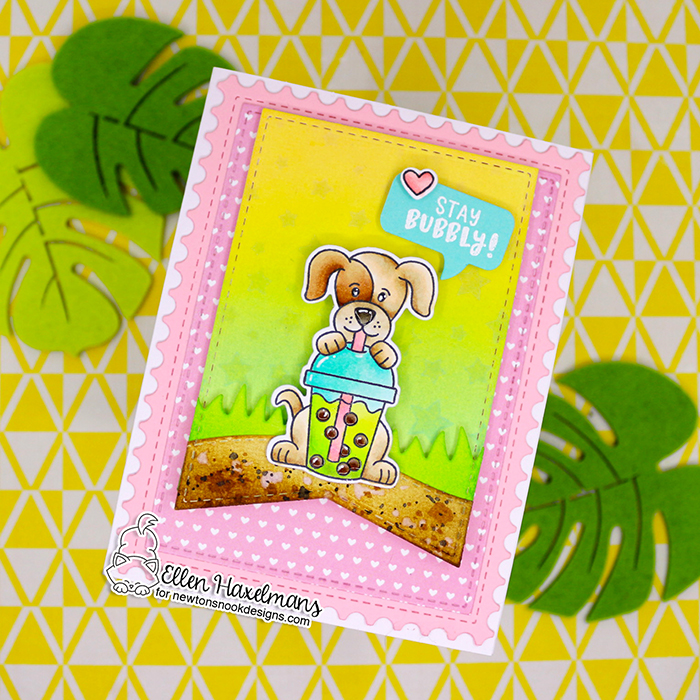
dinsdag 12 maart 2024

Cute Garden Cards with Foil and Flock


Not too long ago there was a Lawn Fawn release, of course I bought some items of it. Even better today I'm showing a super fun duo of cards on the ThermOWebblog for Foil and Flock.                       * Niet zo lang geleden kwam er een Lawn Fawn release uit, natuurlijk kocht ik enkele producten. Nog beter vandaag toon ik een super leuk duo en toon ze op de ThermOWebblog vol met Foil en Flock.

Making Waterproof Stickers


Hello, today we will be making waterproof stickers for the Printable Cuttable Creatables
For this post I’m using a ton of fun designs from PCC:                       * Hallo, vandaag gaan we waterdichte stickers maken voor de Printable Cuttable Creatables!
Voor dit bericht gebruik ik een heleboel leuke ontwerpen van PCC:

Other supplies:                       * Overige benodigdheden:
  • Cricut Machine (I’m using a Cricut Maker)                        * Cricut-machine (ik gebruik een Cricut Maker)
  • StandardGrip Mat                       * StandaardGrip-mat
  • Sticker Paper (I’m using the ‘Cricut Printable Waterproof Sticker Set – Transparant Holografic’)                        Stickerpapier (ik gebruik de 'Cricut Printable Waterproof Sticker Set – Transparent Holografic')
  • Printer                       * Printer


Cricut has a new feature for making stickers ‘Create Sticker’ (this feature is on the Beta Version of Cricut Design Space and only accessible for paying persons).                       * Cricut heeft een nieuwe functie voor het maken van stickers 'Sticker Bewerken' (deze functie bevindt zich in de bètaversie van Cricut Design Space en is alleen toegankelijk voor betalende personen).


First you have to select your image and click on 'Create Sticker'. You can find the button on the top.                       * Eerst moet je je afbeelding selecteren en op 'Sticker Bewerken' klikken. Je vindt de knop bovenaan.

You can choose between two options:                       * Je kan kiezen uit twee opties:
  • Die Cut Stickers: The Cricut machine will complete cut true all layers of the sticker paper.                       * Gestanste stickers: de Cricut-machine snijdt alle lagen van het stickerpapier uit.
  • Kiss Cut Stickers: The Cricut machine will cut with a lighter touch. The top layer is the only thing cut, leaving the liner intact. This is perfect for a Sticker sheet for example for planners.                       * Kiss Cut-stickers: de Cricut-machine snijdt met een lichtere aanraking. De bovenste laag is het enige dat wordt gesneden, waardoor de voering intact blijft. Dit is perfect voor een stickervel voor bijvoorbeeld planners.
For this post I’m using the first option with a custom border from 0,30 cm (0,12 inches).                       * Voor dit bericht gebruik ik de eerste optie met een aangepaste rand van 0,30 cm (0,12 inch).


The sticker paper I’m using is perfect for my Inkjet printer. When the sheet is printed out it’s time to layer the holographic layer on top.                       * Het stickerpapier dat ik gebruik is perfect voor mijn inkjetprinter. Wanneer het vel is afgedrukt, is het tijd om de holografische laag er bovenop te leggen.


What I did wrong!: On the pictures you can see I layered the holographic paper completely on top of the sticker paper. That’s not good. You have to only stick the paper on the illustrations and NEVER COVER UP THE BLACK READING LINES (L-shapes on each corner). Only than Cricut can view where to cut.                       * Wat ik verkeerd heb gedaan!: Op de foto's kun je zien dat ik het holografisch papier volledig op het stickerpapier heb gelegd. Dat is niet goed. Je hoeft alleen het papier op de illustraties te plakken en NOOIT DE ZWARTE LEESLIJNEN (L-vormen op elke hoek) af te dekken. Alleen dan kan Cricut zien waar er moet worden gesneden.


I’m using a little more pressure when cutting the designs (it’s an option you can choose right before your machine starts cutting).                       * Ik oefen wat meer druk uit bij het snijden van de ontwerpen (dit is een optie die je kan kiezen precies voordat je machine begint met snijden).

When it’s finally cut, it’s done!                        * Als het eindelijk is gesneden, is het klaar!


I cannot wait to use these cute stickers on my mug or send them out to friends.                       * Ik kan niet wachten om deze schattige stickers op mijn mok te gebruiken of ze naar vrienden te sturen.

Want to see more ways for sticker making? https://craftyellenh.blogspot.com/2023/08/making-sticker-sheet.html                       * Wil je meer manieren om stickers te maken zien?: https://craftyellenh.blogspot.com/2023/08/making-sticker-sheet.html


I also received an Affiliate Link. This means that PCC rewards me for orders that you place on their website. It costs you nothing extra, but it does give me a nice advantage. You help me a lot if you place an order true this link: www.printablecuttablecreatables.com/?pcc=11. In return I have a nice discount code for you: 'craftyellen15'. This gives you a 15% discount during the entire design team period!                       * Ik heb ook een affiliate-link ontvangen. Dit betekent dat PCC mij beloont voor bestellingen die u op hun website plaatst. Het kost jou niets extra, maar levert mij wel een mooi voordeel op. Je helpt mij enorm als je een bestelling plaatst via deze link: www.printablecuttablecreatables.com/?pcc=11. Als tegenprestatie heb ik een leuke kortingscode voor je: 'craftyellen15'. Hiermee krijg je gedurende de gehele ontwerpteamperiode 15% korting!

vrijdag 1 maart 2024

How To Make Your Own Postage Stamps with Dies


If you want to see how I made these stamps and then used them on a card, head over to Newton's Nook Design blog!                       * Als jullie willen zien hoe ik deze postzegels maakte en daarna ze op een kaartje gebruikte, ga dan snel naar Newton's Nook Design blog!

See you soon.                       * Tot snel.